Making Leaf Mold From Fallen Leaves
Leaf mold is what autumn leaves become after a year or two of slow, fungal breakdown - a dark, crumbly soil conditioner that holds water like a sponge. How to collect and store leaves, which ones to leave out, how to speed it up, and where it is most useful in the garden.
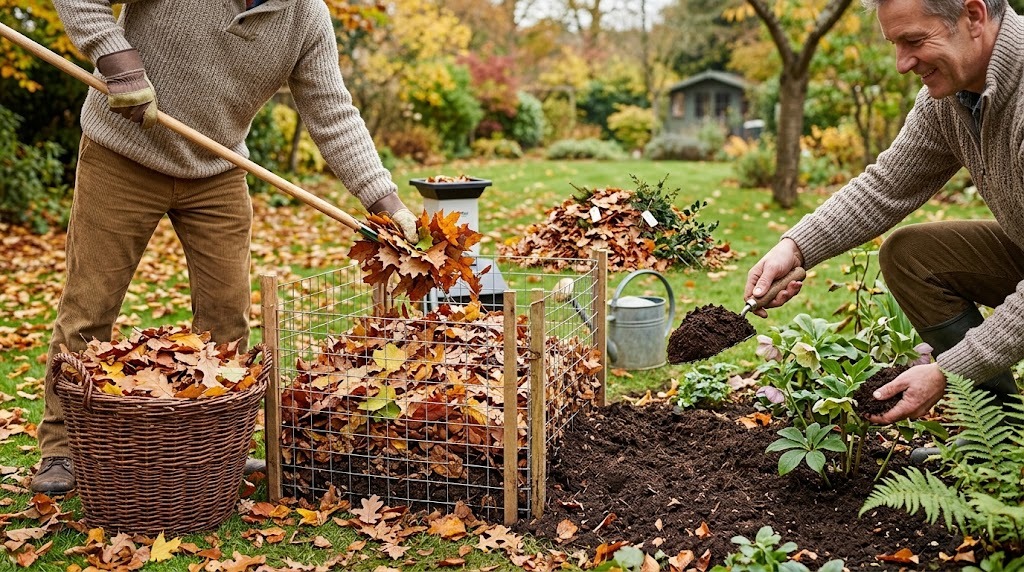
The short version: pile or bag your fallen leaves, keep them damp, leave them alone for one to two years, and you get leaf mold - a dark, crumbly material that improves soil structure and water retention as well as almost any soil amendment there is. It is not a fertilizer and it is not compost. It is slower and simpler than both, and it costs nothing but space and patience.
Late September and October is the time to start, because the raw material is about to fall on your lawn for free.
Leaf mold is not compost
The difference matters because it changes how you make it.
Compost is broken down mainly by bacteria. It needs a mix of green and brown material, heats up, and works in weeks to months. Leaves on their own are high in carbon and low in nitrogen, so in a compost heap they slow everything down.
Leaf mold is broken down mainly by fungi. Fungal decomposition is cool and slow, needs no nitrogen boost and no turning, and happens happily in a pile of nothing but leaves. The result is lower in nutrients than compost, but much better at holding moisture and building a crumbly soil structure. Well-made leaf mold can hold several times its own weight in water.
If you already have a compost system, the two work well side by side. If you have no room for a heap, our overview of indoor composting methods covers bokashi, worm bins and countertop units.
Which leaves to use
Most deciduous tree leaves work. Whatever the mix, count on about two years for fine, crumbly leaf mold - the Royal Horticultural Society’s rule of thumb - sooner in a warm, damp heap and later in a dry one. Sources disagree on which species are quickest, so treat the split below as a guide, not a timetable:
- Break down readily: oak, beech and hornbeam are the classic leaf-mold leaves - the RHS notes they rot down with little help. Birch, cherry, ash, maple and willow go readily too.
- Tougher leaves: sweet chestnut, horse chestnut, sycamore and plane are thicker and slower, and benefit from shredding first.
- Leave out or keep separate: evergreen leaves such as holly and laurel take years. Conifer needles can be collected separately to make an acidic mulch, which is useful around acid-loving plants but slow.
- Use with care: walnut leaves contain juglone, a compound that can inhibit some plants. It breaks down with time, so some gardeners add walnut leaves only in small amounts and age them fully.
Avoid leaves collected from roadsides, which can carry litter and pollutants, and leaves visibly covered in disease if you intend to use the result around the same kind of plant.
Two simple ways to make it
The bin. Drive four stakes into the ground about a metre apart and wrap chicken wire or mesh around them. Fill it with leaves, water them if they are dry, and press them down. As the pile sinks, add more. This is the best option if you have a lot of leaves and a corner to spare.
The bag. Put damp leaves into a strong plastic sack or old compost bag, tie it loosely, and punch a few holes in the sides and bottom with a garden fork. Stack the bags somewhere out of the way. This suits small gardens, and the bags are easy to check.
Either way, the leaves must stay moist. Dry leaves simply do not break down, and a year later you will have a bin of crisp leaves. If you squeeze a handful, it should feel like a damp sponge rather than dripping or dusty.
How to speed it up
Size is the biggest factor. Shredded leaves can be usable in six to twelve months instead of two years. You do not need a shredder: run a mower over leaves spread on the lawn, with the collection box attached, and you get shredded leaves with some grass clippings mixed in, which adds a little nitrogen and helps.
Beyond that, keep the pile damp, keep it in partial shade so it does not dry out, and leave it alone. Turning it is not necessary.
When it is ready and how to use it
Leaf mold is ready when the leaves are dark brown, crumbly, and no longer recognisable as individual leaves. There is no exact date. Check in late spring or autumn of the following year.
- After one year, it is still coarse. It makes an excellent mulch around shrubs and perennials, applied a few centimetres thick on damp soil in autumn or spring.
- After two years, it is fine and crumbly. Dig it into beds to improve sandy soil that dries out or heavy soil that stays sticky. Our guide to improving garden soil covers how it fits alongside other amendments.
- Well-rotted and sieved, it is a traditional ingredient in homemade seed-sowing and potting mixes, where its water-holding texture is useful. The soil mix calculator can help you work out proportions if you blend your own.
Because it is low in nutrients, plants in containers or hungry beds will still need feeding from another source.
Fitting it into your autumn
Leaf collection slots naturally into the rest of the season’s jobs. Clearing leaves from lawns, paths and the crowns of low perennials reduces rot and slug hiding places, and every bag that goes into a corner instead of the waste collection becomes something useful. If you are working through the garden before winter, our fall garden checklist covers the other tasks worth doing while you are out there.
The only real cost is patience. A bag of leaves you fill this weekend will be one of the best soil conditioners in your garden by the autumn after next.
🛒 Recommended Gear on Amazon
- Jute leaf sacks - browse current options and reviews on Amazon.
- Leaf rake - browse current options and reviews on Amazon.
- Compost bin - browse current options and reviews on Amazon.
As an Amazon Associate, we earn from qualifying purchases - at no extra cost to you. This helps us keep producing free, in-depth guides.