IKEA Greenhouse Cabinet Build
Turn an IKEA Milsbo or Rudsta into a humid plant cabinet: full parts list, step-by-step build, target humidity and temperature, and which plants belong inside.
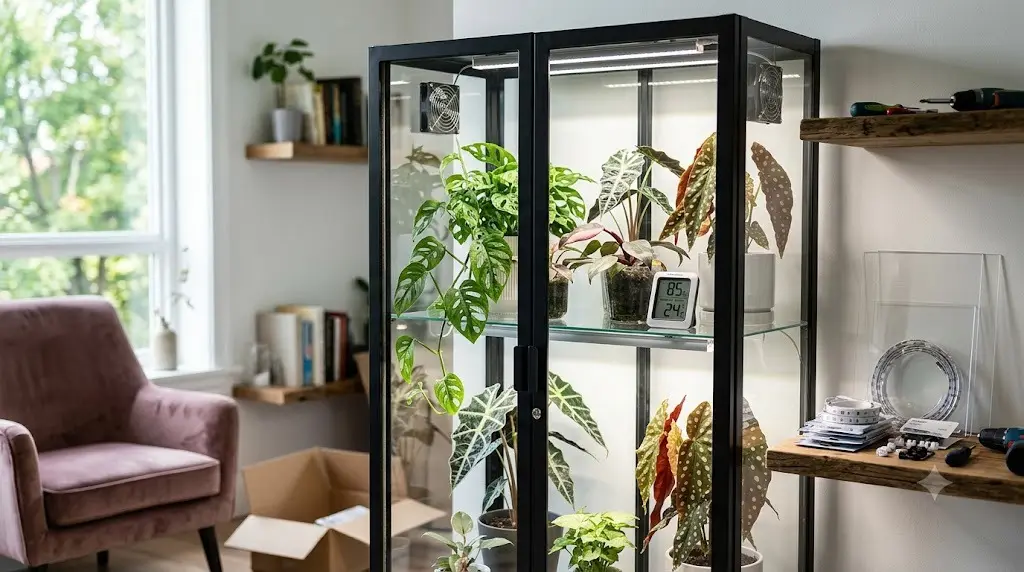
An IKEA greenhouse cabinet is a glass display cabinet (usually a Milsbo or Rudsta) converted into a mini indoor greenhouse with grow lights, small fans, and partial sealing - and the reason the trend refuses to die is that it solves a real problem. The University of New Hampshire’s extension service puts the numbers this way: most houseplants prefer a relative humidity of 40-60%, while tropical species thrive at 70-80% - more than an ordinary room offers, above all in the heating season - and a sealed-ish glass box holds humid air the way an open shelf never can. Expect to pay for the cabinet, lights, two fans, a hygrometer and a timer, and to spend one afternoon on assembly and a week on dialing in. Here is the complete build: cabinet options, the full parts list, steps, climate targets, and which plants actually belong inside.
Choosing the Cabinet
Any glass-doored cabinet works in principle; these are the proven platforms:
- Milsbo tall (28 3/4 x 68 7/8 inches) - the roomiest of the common choices: real vertical space for climbers and larger plants, glass on all sides. If you have the floor space, this is the default recommendation.
- Milsbo wide/low (roughly 40 x 39 inches) - same construction in a squat format; excellent as a sideboard-height cabinet and easier to light evenly.
- Rudsta (tall 16 1/2 x 61 inches; wide 31 1/2 x 47 1/4 inches; both 14 5/8 inches deep) - slimmer and cheaper than the Milsbo, metal-framed, fits where a Milsbo will not. The narrow depth suits small collections, jewel boxes, and renters.
- Fabrikör - the charming metal-and-glass option, smaller and often pricier per liter of growing space; chosen for looks more than capacity.
- Secondhand anything glass-doored - display cases and curio cabinets convert identically; check that shelves adjust or can be replaced.
Prices and lineups change, so we quote none: check IKEA’s current listings. One structural note: glass shelves look wonderful and block airflow and drip light unevenly; part of the standard conversion is replacing or augmenting them - covered below.
The Full Parts List
Essential:
- Grow lights - the heart of the build, because a glass box away from a window is a dark box. Full-spectrum LED strips, bars, or panels sized to the cabinet: typically one light per shelf level, or strong top lighting for open tall builds. Look for lights sold with mounting tape/clips and daisy-chain connectors; warm-white full-spectrum LEDs grow plants perfectly well - purple “blurple” lights are unnecessary indoors.
- Circulation fans - non-negotiable, and the part beginners skip. Still humid air breeds fungus, mold, and rot; moving humid air grows plants. Two small USB fans (40-80mm PC-style fans, or purpose-made cabinet fans): one low, one high, on gentle speed, running at least several hours a day. Leaves should tremble slightly, not wave.
- Hygrometer/thermometer - a digital combo unit (or two: one high, one low) so you are managing numbers, not vibes. Bluetooth-logging versions are a genuinely useful upgrade for spotting overnight swings.
- Timer or smart plug - lights on a 10-14 hour schedule, fans scheduled or continuous, all automatic. Keep the power strip OUTSIDE the cabinet (behind or beside it, never in the humid interior), on one smart plug - it runs the whole show while staying dry.
- Weather stripping / door seals - thin adhesive foam or silicone strip along the door edges. Cabinets like the Milsbo leak air generously at the doors; sealing the worst gaps is what lifts humidity from “slightly better than the room” to 60-80%. Critical honesty: do not hermetically seal the cabinet. You want it snug, not airtight - some passive exchange plus internal fans is the anti-mold formula.
Strongly recommended:
- Shelf upgrade - the stock glass shelves block light to lower levels and stop airflow. Common solutions: wire/mesh shelves cut to size, plastic light-diffusing grid (“egg crate” louver panel from hardware stores, easily cut) laid on the existing shelf pins, or simply removing shelves for tall climbers.
- Cable pass-through - power has to get in. Options in order of invasiveness: route flat cables through the door gap under a seal strip (easiest, fine for most), drill a grommet hole through the back panel (clean, permanent; metal-backed cabinets need a step drill bit), or bring everything through the base. A rubber grommet tidies a drilled hole.
- Drip trays - every pot on a saucer or the whole shelf on a boot tray; standing water on cabinet steel means rust eventually.
Optional, by ambition:
- Small humidifier (mini USB units fit inside) for arid homes or humidity-diva plants - many builds reach the target without one once sealed, so add this only if your hygrometer says so.
- Heat mat with thermostat for propagation boxes or warmth-loving species in cold rooms.
- Magnetic-catch upgrade or child lock if the doors drift open.
- Mirror or white acrylic back panel to bounce light on dark-backed cabinets.
The Build, Step by Step
- Assemble the cabinet per instructions, but pause before installing shelves - decide your layout first (tall plants where, which shelf heights) and do any back-panel drilling now, while access is easy. Level the cabinet; doors on these models are fussy about racking.
- Plan the zones. Top shelves run brighter and warmer, bottom cooler and dimmer - that is a feature: map plants to zones (propagation and shade-lovers low, light-hungry up top).
- Mount the lights under the cabinet top and under each shelf above a planted level, adhesive plus zip ties or clips for insurance (adhesive alone fails in humidity - back it up mechanically). Aim strips slightly toward the glass center; distance from light to leaves ideally 6-12+ inches for strips.
- Place the fans: classic arrangement is one fan low at the back blowing across, one high blowing opposite, creating a gentle loop. Zip-tie to shelf frames or use adhesive mounts, again mechanically backed up.
- Route the power through your chosen pass-through to the smart plug/power strip. Drip-loop any cable that runs downward to a plug - water follows cables.
- Seal the doors with weather stripping along the frame where the doors meet it, leaving the strip off one edge or the top if your cabinet closes very tight - remember: snug, not airtight.
- Instrument it: hygrometer/thermometer visible through the glass, one high and one low if you have two.
- Dry-run 3-7 days with plants outside (or a sacrificial pothos inside). Lights 12 hours, fans on, a tray of water or a few watered pots for moisture load. Watch the numbers: you are tuning toward 60-80% RH and 65-80°F / 18-27°C, with condensation appearing at most briefly at night. Persistent dripping glass = too sealed or too little fan; humidity stuck at 50% = seal more gaps or add moisture load. Adjust, then move the plants in.
Running the Climate
- Humidity: 60-80% suits nearly everything that belongs in a cabinet; humidity that stays near saturation invites mold - more fan, more gap.
- Temperature: 18-27°C (65-80°F); LEDs add a few gentle degrees, which the plants mostly appreciate. Keep the cabinet out of direct sun (a glass box in sunlight is a solar oven) and off cold exterior walls in winter.
- Lights: 10-14 hours on the timer. Etiolated stretch = more hours or closer lights; bleached or crisped new leaves = back the lights off.
- Watering changes: everything dries slower at 70% humidity. Expect to water far less often than your shelf plants, and check with a finger, not a calendar. Fungus gnats love a humid cabinet with wet soil - letting topsoil dry, sticky traps, and good airflow keep them boring. Our watering-interval and light-level calculators in tools help recalibrate.
- Monthly five minutes: wipe interior glass, check for standing water and rust spots, dust the fan blades, confirm the hygrometer still agrees with reality.
What to Grow Inside
The cabinet is for plants that sulk at room humidity:
- Calatheas and prayer plants - the poster children; brown-edge machines at 40% RH, glossy and flat-leaved at 70%
- Anthuriums (especially velvet-leaf types), alocasias, and fancy philodendrons - the aroid showpieces that justify the build
- Jewel orchids, mini orchids, ferns (maidenhair finally behaves), begonias (rex and other fancy-leaf types), peperomias of the humid persuasion
- Hoyas - many take well to cabinet life
- Propagation of almost anything - a cabinet is a giant prop box; cuttings root readily in humid air (pair with our propagation guides)
- Terrarium-adjacent small stuff: mosses, miniature tropicals, seedlings
Keep out: succulents, cacti, and other arid-climate plants (humidity is actively bad for them), plus anything already thriving on your windowsill - the cabinet is for the divas. Full care profiles for every species above are in our plant library.
The Short Version
- Platform: Milsbo tall for capacity, Rudsta for tight spaces and budgets.
- Essentials: full-spectrum LED strips per shelf, two small fans, hygrometer, smart plug/timer, door weather stripping - snug, never airtight.
- Swap glass shelves for mesh or louver grid; route power cleanly; dry-run a week to hit 60-80% RH and 18-27°C.
- Fans and a monthly wipe-down are the anti-mold program.
- Stock it with calatheas, anthuriums, alocasias, jewel orchids, ferns, and cuttings - not succulents.
🛒 Recommended Gear on Amazon
- LED grow light strips - browse current options and reviews on Amazon.
- Digital hygrometer - browse current options and reviews on Amazon.
- Clip-on circulation fan - browse current options and reviews on Amazon.
As an Amazon Associate, we earn from qualifying purchases - at no extra cost to you. This helps us keep producing free, in-depth guides.